Setting up a rental property in Quickbooks Online
The sole purpose of this post is to document the process by which I bring a new rental property into my accounting system, Quickbooks online.
Create Your Asset Accounts (3 total)
Think of it this way, you will need one account (or in this case, one account with two sub-accounts) to track the value of the asset and you need another one to track the debt associated with financing the purchase. I use one parent account called simply the name of the property. The two sub-accounts keep track of 1) the original cost of the property and 2) the total depreciation taken to date. This is what it looks like when all the accounts are lined up.

Let’s make this a little bit easier. When you set up your original asset account, Quickbooks will actually ask you if you want to track depreciation for the asset. If you check the box that says “Track depreciation of this asset” you will be asked to enter your current depreciation and effective date.
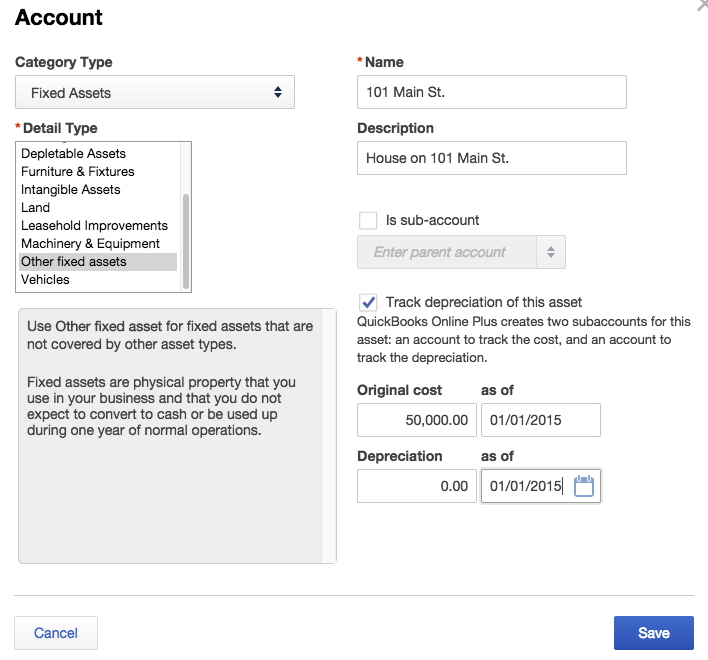
Set up rental property asset account in Quickbooks Online
I usually use the Category Type of “Fixed Asset” and the Detail Type of “Other Fixed Assets” for rental properties for no other reason than that the other options don’t seem to apply well to houses. The screen shot on the right is what the asset account setup looks like. This one step will actually create three separate accounts, all the “Fixed Asset” accounts needed so you do not actually have to manually create the “Original Cost” and “Depreciation” accounts associated with a property.
Create your liability account
Bookkeeping is like Newton’s Third Law of Motion, except instead of “for every action” think of it as “for every asset created, there is an equal and opposite transaction or set of transactions to offset it”.
You can’t just create an asset out of thin air and put it on your books, it had to come from somewhere. Did you pay cash for it? Well then there should be a transaction in your cash accounts that shows that. Most likely you financed it somehow and so you need an offsetting debt account. I will show you how to set up the debt account then get into a few more details on the actual amount of the debt account.
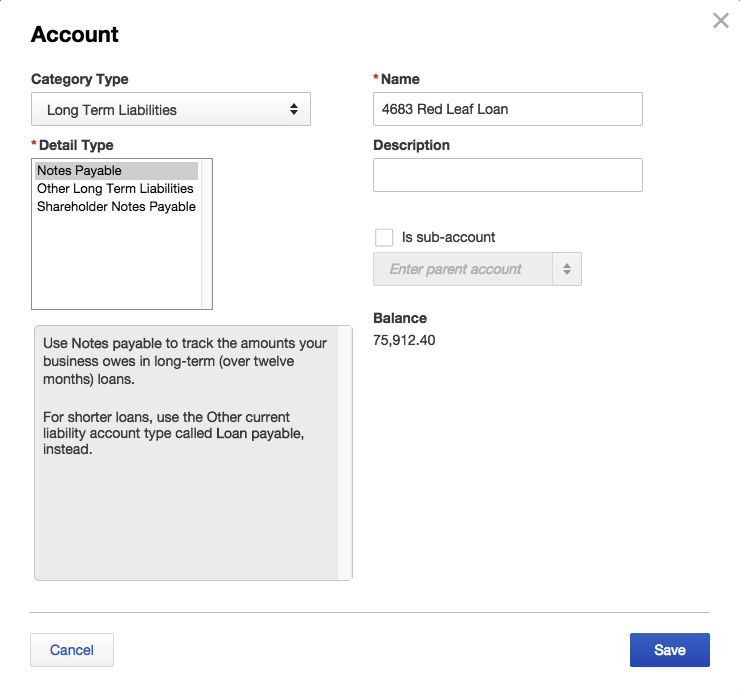
aSet up of debt account associated with rental property
For home loans, I use “Long Term Liabilities” as the Category Type and “Notes Payable” as the Detail Type. The rest is fairly self-explanatory. This is not considered a sub-account so do not check that box. Name the loan the address of the property plus “loan”. So if the address is 101 N. Main, name the account 101 N Main Loan. This way you can pull all of your loans up easily in your Chart of Accounts by just searching for “loan”.
Also remember, all the account that you just created are asset and liability accounts and so they will not show up in your P&L Statement, only on your balance sheet. No expenses were involved thus far and no income was involved. You created an asset and it’s corresponding liability.
Opening Balance Equity???
When you create an asset account, there needs to be a corresponding liability created at the same time. When you create the asset account through the account creation wizard, Quickbooks actually creates this liability account for you and calls it “Opening Balance Equity {4}”. Oh and by the way, when you create a liability account, Quickbooks also creates a temporary asset account called, you guessed it, “Opening Balance Equity {5}”.
Think about these account this way, you want to create an asset account (the house itself) and a liability account (the loan on the house) but ended up with two asset accounts (the house PLUS Opening Balance Equity {5}) and two liability accounts (the loan PLUS Opening Balance Equity {4}). This is redundant, messy, and confusing. What you need to do is manually offset the asset account with the loan account, and then manually offset the loan account with the asset account, thereby getting rid of all of the Opening Balance Equity accounts.
Here are the steps to do this:
 1. Run a Balance Sheet report. Scroll to the “Equity” section at the bottom and click on whichever “Opening Balance Equity” account was created. Assuming the loan and the asset created are the same value, the actual value of this account will be zero since the two transactions offset eachother.
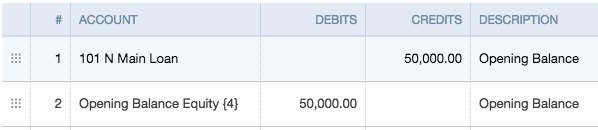
2. You will see two journal entries to choose from, click on one of them. It should look something like the journal entry below. The Original Cost of this asset is offset by a temporarily created Opening Balance Equity Account. Since we want the asset purchase to be offset by the loan instead of the temporary account, we just change change the account from Opening Balance Equity {4} to “101 N Main St Loan.

Changes to:

3. Now remember, there were actually two journal entries associated with Opening Balance Equity. Since we have already successfully and completely accounted for the fact that the house (asset) was offset by the loan (liability), we can actually delete the other journal entry, which in our case looks like this:
One way to think about this is to picture that the original asset purchase was offset by a Opening Balance Equity liability, which in turn was offset by a Opening Balance Equity asset, which in turn was offset by the loan. We just removed the two middle steps and directly joined the asset and liability.
What about closing costs and down payments?
In reality, no real estate transaction is limited to an increase in assets and liabilities. In other words, it’s never just a balance sheet transaction. You most likely have a down payment and closing costs that you pay in cash. I will write another post about the closing cost Quickbooks Online transaction but for now just remember that the offsetting transaction for the asset will end up being partly the loan and partly cash and will need to be notated as such in these accounts. Likewise, the closing costs will need to be accurately recorded as expenses.
If you have any questions regarding the setup of rental properties in Quickbooks Online, please feel free to either comment below or contact me here.
Hi Matt,
My name is Raj Shafaii. I buy and rent houses and town homes in Houston. I just want to thank you for your post under “Setting up a rental property in Quickbooks Online. It is written so well and so easy for anyone to follow. I was a great help.
Thanks again
Raj Shafaii
I know you wrote this over a year ago, but just found your site as I was searching for help setting up Quickbooks. I have one rental property so far with hopes to add more. Thanks for this info. Very helpful as the whole accounting thing can be complicated at first.
Keep posting!
Appreciate the income reports also. Good “real world” stuff.